|
|
Welcome to - Lew's Model Boats - and more! |
go to Home Page |
| LewsModelBoats.org is not a commercial web site. Lew is a scale model builder/hobbiest (model boats and more). Views on this web site are opinions of the author and not driven by any commercial entity. Opinions are welcome - by mailing Lew (see contacts). © Copyright 2024 Lew's Model Boats. Disclosure: This Lews Model Boats do not have any financial ties to any company, political affiliation nor any other subsidy and has no gains from these and any other person(s). Lews Model Boats and this site is purely for the enjoyment of its viewers and others who enjoy this hobby. |
Bow Thruster: Do It
Yourself ! (for operational scale model
boats)
Updated: August 24, 2023
Updated: August 24, 2023
Forward
This is a Bow Thruster for the "do it yourself" builder. It is a completely new design which allows easire removal of the motor and
impeller blade. Many Bow Thrusters do no allow removal of the motor or impeller blade because that
would require the entire Bow Thruster
to be removed from the boat's hull. This is a very difficult,
messy, and time consuing task.
This Bow Thruster has the mounting screws facing aft so the unit's components can be removed from inside the hull. The motor can be changed out easily depending on where you locate it. As the motor is connected to the Bow Thruster with a shaft the builder has the option for the motor's location.
The water cross flow tube is approximately 5/8 inch inside diameter. The information on how to make your own Bow Thruster unit includes 3D prinable files in STL format and instructions which are both on this site and are free to use. Lew is the designer so there is no copyright required, all free to use (personal use only). All you need is an FDM 3D printer and ABS filament, and a few mechanical parts to hold the Bow Thruster together plus the materials for the shafts, couplings, and motor. Use .4mm zozzle and print at the best quality available. All features of the part compensate for the thickness of the filament so no re-sizing should be necessary. (Not for printers other than FDM types.)
YouTube Video Link:
Bow Thruster
 How it works
The Bow Thruster is a simple operation. An electric motor spins a paddle shaped impeller inside the housing. Depending on the the
direction of the motor, water will flow in one direction or the other.
Most boat are driven by a propulsion system (propellers, jet drive, etc.) at the aft (rear) end of the boat and is turned by operation of a rudder or steering mechanism. The result of this when moving forward the resulting turn is like driving a conventional automobile backwards, similar to pushing a grocery store cart from the front end. By using a Bow Thruster the bow (front) of the boat is "pushed" sideways" in the desired direction.
The Bow Thruster serves two functions, helping turnn the boat while it is moving forward (or backwards) creating a more gentle arc or turn. This thruster can also move the bow of the boat while it is not moving forward or reverse which is helful in aiming the boat in a ceertain direction or when docking.
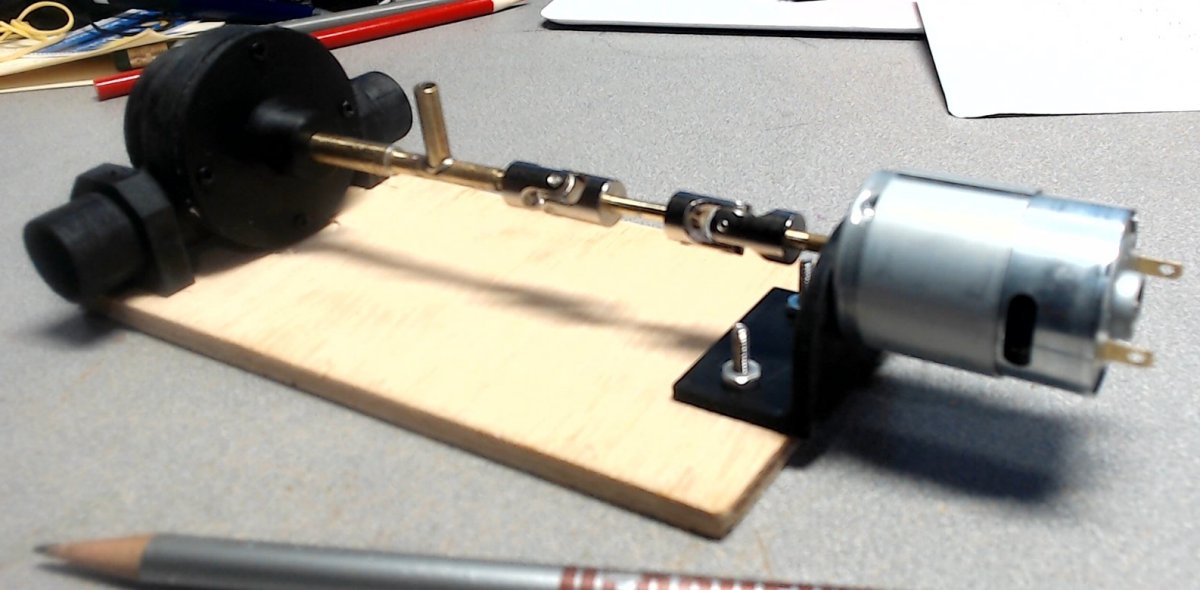
 The Pieces
The Bow Thruster is composed of the following parts:
Thruster Housing - 3D printed (ABS)
Thruster Impeller - 3D printed (ABS)
Thruster Impeller plate - 3D printed (ABS)
Thruster Flange - 3D printed (ABS)
Gasket (not shown) make to fit between Housing and Flange
Motor Bracket - 3D printer (ABS) - an optional part used to mount the motor on a test base.
Motor Screws (4) - M2.6 X length as desired
Thruster Housing Saddles (2) - 3D printed (ABS) - optional parts to hold the Thruster Housing on a test base
Sheet Metal Screws (4) M2.6X8 - to mount Flange to Housing
Copper tubing and solid round stock dimensions per drawing
Universal Joint couplings (2) 1/8 In X 1/8 inch (your choice)
Motor - Maubuchi number RS-380PH-3270 (or equiv) (Ebay)
Test base - made from wood (if desired)
 Assembling
The first step is to cement the Impeller Plate to the Impeller using an ABS "weld" type (actually melts the mateials together). I found that Testors liquid cement does this well.
Keep the surfaces parallel annd even. Use caution to make
sure the Impeller blade edge seats into the Impeller Plate slot.
You miight need to clean up the slot in the Plate with needle files.
Next (can be first) is to make the parts. Click on the picture at the right to download the information sheet with all the dimensions necessary. You might want to change some dimensions for your particular installation (see "Hints" below).
Check to see if the shaft will slightly press fit into the impeller. Then use supre glue (Cyanoacrylate) and cement into position all the way to the bottom of the hole in the Impeller.
Check all pieces for a close fit to one another. All surfaces should be smooth and even. All surfaces should have a fine finish.
Finish all other parts, making sure coulings, motor, shaft, stuffing box all fit well together. The stuffing box, inner bushings, and feed tube are all made to traditional stuffing box procueures. The alignment of the shafts, couplins, and motor should be as straight as possible to allow smooth running.
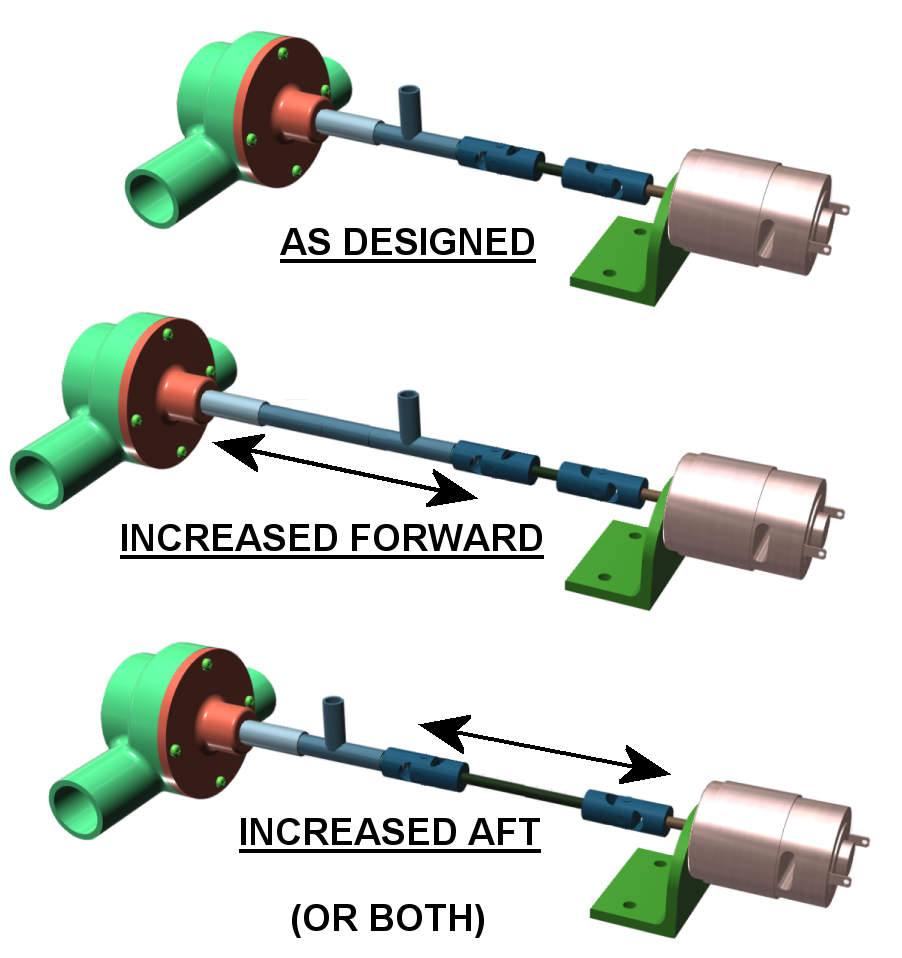 Hints
Hints
The shafts and stuffing box dimensions give on the drawing should be
minimum lengths. Your location of the motor will probably be different. You may wish to place your motor further aft which means theat your shaft and stuffing box might be longer possible
requiring some sort of support at the end of the stuffing box where it meets the first U-joint. You might also opt for a longer shaft between the couplings.
More options are the use of a flexible shaft or gears.
I recommend using ABS for the 3D FDM printer with 100% infill. Painting is up to the builder, however a painted finish might affect the cementability of the parts. Certainlly, if you are cementing this to styrene, ABS, using solvent cements you will not get a "weld" joint.
Hints
3D printable downloadable files are available (free to use, just select):
| Item Description | File Name (select to download) | Info |
| Thruster Housing | LMB-bow-thrster-housing | Make one |
| Thruster Impeller | LMB-bow-thruster-impeller | Make one |
| Thruster Impeller Plate | LMB-bow-thruster-plate | Make one |
| Thruster Flange | LMB-bow-thruster-flange | Make one |
| Housing Saddle (optional) | LMB-thruster-saddles | Make two |
| Motor Bracket (optional) | LMB-thruster-bracket | Make one |