|
|
Welcome to - Lew's Model Boats - and more! |
go to Home Page |
| LewsModelBoats.org is not a commercial web site. Lew is a scale model builder/hobbiest (model boats and more). Views on this web site are opinions of the author and not driven by any commercial entity. Opinions are welcome - by mailing Lew (see contacts). © Copyright 2024 Lew's Model Boats. Disclosure: This Lews Model Boats do not have any financial ties to any company, political affiliation nor any other subsidy and has no gains from these and any other person(s). Lews Model Boats and this site is purely for the enjoyment of its viewers and others who enjoy this hobby. |
Grab-it: A Claw for Retrieving Items Underwater (and more)
Updated: May 6, 2022
Updated: May 6, 2022
Forward
This is a claw for retrieving small (up to around 6 inches wideX about 2 inches thick) from underwater, down a hole, or perhaps some other hard
to access place. This was designed to retrieve small water models in water that one does not want to go into (gators, snakes, bacteria).
The information on how to make your own includes 3D prinable files in STL format and instructions which are both on this site and are free to use. Lew is the designer so there is no copyright statment violation, free to use. All you need is a 3D printer and ABS filament, and a few mechanical parts to hold the claw together. Add a piece of 1/2 inch PVC pipe traditionally use for plumbing and asome small rope and you are ready to go!
The information on how to make your own includes 3D prinable files in STL format and instructions which are both on this site and are free to use. Lew is the designer so there is no copyright statment violation, free to use. All you need is a 3D printer and ABS filament, and a few mechanical parts to hold the claw together. Add a piece of 1/2 inch PVC pipe traditionally use for plumbing and asome small rope and you are ready to go!
 How it works
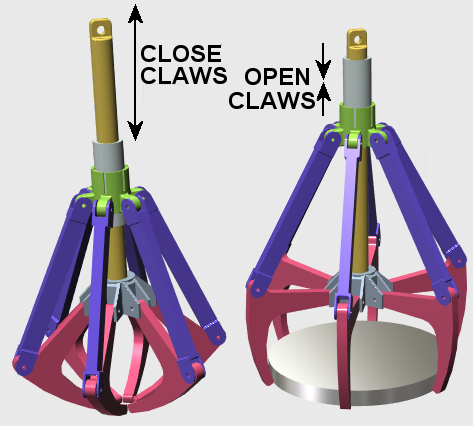
Using Grab-it is a simple opeation. Think of your arm's and hand's opeation. Push your hand (claw) away from your body and you open you hand
(claw). To grab your object pull your hand (claw) back towards your body closing the claws.
Following the picture at the right, the claw is opened by pushing the center rod down through the outer tube. To close the claw, pull the center rod up through the outer tube. If you need to use the Grab-it in any position (horizontal, vertical up or down) you can use an inner rod (more info below). If you use the Grab-it for picking up items (vetical, claw down) you can use a center rope in place of the center rod as the claw tend to open in this orientation.
The number of claws can be easily changed. You can have 2, 3, 4 or six claws depending on the object you are trying to pick up. The capacity of the claws is over six inches between opposite claws. The slight tips on the claws grab slightly over 2 inches deep.
There are tips (hints) below which tells you how to add friction gripping for smooth objects. The length of the pole and rope is user defined. Example, if you are trying to reach down in eight feet of water you could use a 10 foot section of PVC pipe and a 12 foot long piece of small diameter rope. More below.
 The Pieces
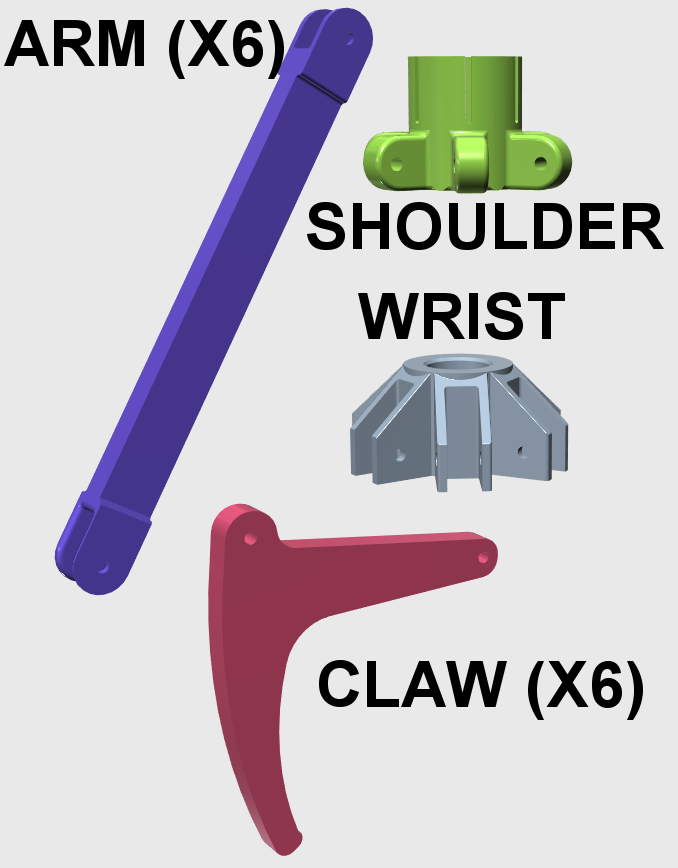
The claw assembly is composed of various pieces, some 3D printed, smoe purchased, and some made from other materials.
The 3D printed parts (picture, right) has four basic shapes with two of the shapes requiring one piece of each and the other two shapes requiring six pieces each.
There is one shoulder, one wrist, six arms, and six claws, all to be 3D printed. Recommended for these items is a FDM printer using ABS filament, all printed with 100% infill.
One section of 1/12 inch PVC plumbing pipe, schedule 40 (thick walls) recomended. The length is what ever you desire.
One length of braided rope, about 1/8 inch to 3/16 inch. Length should be the PVC pipe length plus about two feet.
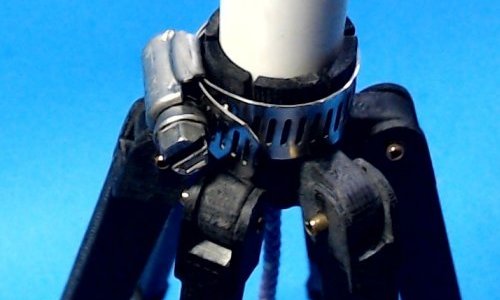
Hose clamp to fit about 1-1/8 inch diameter (shoulder piece to PVC pipe).
Joint fasteners - you will need twelve. Your choice, see instructions below.
There is one shoulder, one wrist, six arms, and six claws, all to be 3D printed. Recommended for these items is a FDM printer using ABS filament, all printed with 100% infill.
One section of 1/12 inch PVC plumbing pipe, schedule 40 (thick walls) recomended. The length is what ever you desire.
One length of braided rope, about 1/8 inch to 3/16 inch. Length should be the PVC pipe length plus about two feet.
Hose clamp to fit about 1-1/8 inch diameter (shoulder piece to PVC pipe).
Joint fasteners - you will need twelve. Your choice, see instructions below.
Assembling
 The first step is to decide what fastener you want to use for the joints. The holes in the parts are designed at .125 (1/8) inch in diameter but will be
slightly under size due to the FDM process. You can use nut and screw and washers, rivets, cotter pins, straight pins, etc. I opted for using "straight pins" cut from .125 inch diameter copper
tubing (from hobby or hardware store) cut to 9/16 inch long with a slight chamfer or rounding to the ends for easiear pressing into the parts.
The first step is to decide what fastener you want to use for the joints. The holes in the parts are designed at .125 (1/8) inch in diameter but will be
slightly under size due to the FDM process. You can use nut and screw and washers, rivets, cotter pins, straight pins, etc. I opted for using "straight pins" cut from .125 inch diameter copper
tubing (from hobby or hardware store) cut to 9/16 inch long with a slight chamfer or rounding to the ends for easiear pressing into the parts.To keep the pins in place yet have a free moving joint I used two different size drills, .121 inch diameter and .133 inch diameter. I drilled out the Claws (2 holes each) and the Shoulder (6 holes) using the .121 inch drill (slightly undersized for the pins) drill as this is where the pins would have a press fit. I drilled out the Arms (2 holes in each arm) and the Wrist (12 holes) with the .133 inch drill as this is where the free movement of the pins would be.
Second step is to make sure all joints are free moving - some sanding to the parts may be required depending on your printer and material. Assemble all of the parts orientated as per the pictures in this instruction. Use your own metheod. I assembled each Claw and Arm together then to the wrist and shoulder, working myself around.
Third step is to assemble the PVC pipe into the Shoulder completely and tighten with a hose clamp around the slotted round section of the Wrist compressing it on to the PVC pipe. You can cement this if you want a premanent fit, but if you use the hose clamp you can change out the PVC pipe to a different length later on.
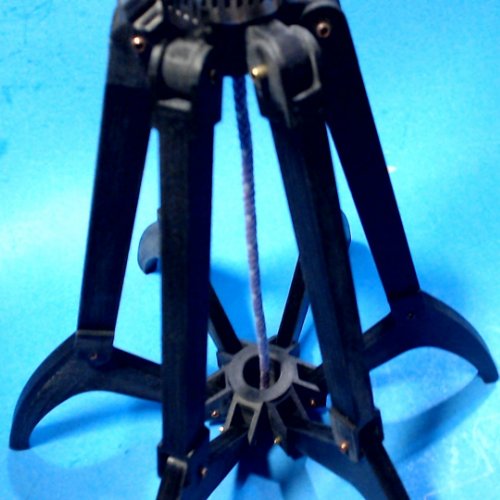
Last step is to add the rope to the assembly. This is done by drilling a hole in the center bottom of the Wrist piece. The hole should only be large enough for the rope to pass through. Make a small knot in the end of the rope (add some super glue to it to prevent it from unraveling). Feed the un-knotted end through the hole up into the the Shoulder and PVC pipe. You should be able to pull the rop and the Claw will close.
Hints
 To improve the "grip" of the claws (if you are picking up a slippery object) you can use some foam tape with adhesive around the
Claws. You can also use rubber bands twisted several time around the tips of the
Claws, or slide a section of silicon tubing over the Claw tips.
To improve the "grip" of the claws (if you are picking up a slippery object) you can use some foam tape with adhesive around the
Claws. You can also use rubber bands twisted several time around the tips of the
Claws, or slide a section of silicon tubing over the Claw tips.If you need to have more weight to push the Wrist down for the Claw to open (maybe something is binding) you can add some metal weight on the rope above the Wrist. One example is metal washers.
Fittings are available for PVC pipe to either extend or change the angle of the pipe. There are also fittings to adapt to other sizes of pipe.
After you feed the rope up through the pipe tie a large knot or add a handle to it to prevent the rope from dropping back down into the pipe.
This Claw is designed to work in the whole assembly in the down position. However it can work upright as well. You will need to replace the rope with a rod or tube that goes through the Shoulder piece and into the Wrist piece. The rod and the Wrist piece should then be fastened together. The Claws will thn close by pushing on the rod. Another alternative is a compression spring between the Shoulder and Wrist with the rope going through the center of the spring.
Hints
3D printable downloadable files are available (free to use, just select):
| Item Description | File Name (select to download) | Info |
| Shoulder | Grabber Shoulder | Make one |
| Wrist | Grabber Wrist | Make one |
| Arm | Grabber Arm | Make two, four, or six |
| Claw | Grabber Claw | Make two, four, or six |